Wednesday, June 16, 2021

A New Ruler Does the Trick

It's been an odd year to be sure. The universe gave me lots of time during quarantine to quilt, read, walk, and eat more than I really needed to eat.  I think a lot of my mood was attributed to a long bleak winter and missing seeing family and friends.  I did manage to get some quilting projects finished and mailed to their new owners as well of getting lots of face masks sewn.  I have a large lap quilt that is ready for the hand binding on the back and then that pretty much completes the larger projects on my list.  The majority of projects completed just needed making binding, adding binding to the front and then hand sewing the binding to the back of the item.

Binding has not been my favorite activity but I was determined to improve how I created the binding strips and joined them together.  

I also had several jelly rolls that were just waiting for a lightbulb moment.  One jelly roll had been opened so I could see the colors of the 40 strips.  They really called to me!  I wanted to make a jelly roll race quilt which I knew I could make in less than a day.  But I was not looking forward to drawing 45 degree lines on the ends of each strip in order to sew them together.  There had to be a better way.  I have been striving to learn a new technique with each new project when possible so I explored options.  Then I found the perfect solution when I was binge reading You Tube quilting sites!  I discovered a new ruler by Creative Grids called a Folded Corner Clipper designed by Susan Nelson.  


This ruler will cut corners from 1 inch to 5 inches.  Lots of tutorials are available on the web, just use your favorite search engine to find them.

The jelly roll race quilt used 40 strips which means 80 ends to connect.  The ruler made easy work of this task! 


This shows the placement of the ruler for cutting 2.5" strips.

Once cut, the 2 ends fit together like pieces of a puzzle.  Then sew.  Once the ends are connected, just keep adding the strips together to complete the top of the race quilt.  This took me less than 3 hours.  Here is the top I made.  It now needs borders, backing and binding and will finish to a 50" x 65" quilt top before borders.  I will definitely use my new ruler to make the binding strips as well.  


This is the top so far, it's a Robert Kaufman jelly roll in Vincent Van Gogh colors.  I have 2 more jelly rolls that are ready for racing as well!  Now to search my stash for backing and binding fabrics!  

Enjoy your day folks, do something quilty!  


Friday, August 2, 2019

Thinking inside the box(es)

I have not posted in a while due to a busy schedule of home improvement projects, family get-togethers, travels to OBX, and spending time at our cabin fishing for the big bass and tasty trout.  However, I have been able to chisel out some time for some quilt related activities.  I have a few quilts nearing completion but most of what I could do needed to be mobile projects that did not require a sewing machine and could be done at our mountain cabin.  

Some of the things that I worked on included sorting and culling down my magazine collection, sorting my boxes and bags of scraps, cutting the aforementioned scraps into shapes and sizes for future projects and hand quilting the bindings onto sandwiched quilts.  I also managed to sort my quilting tips, tricks and patterns that I have printed and clipped over the last 25 years or so into plastic sleeves and file them by category into binders. 

One of my favorite sizes that I cut my scraps into is 2.5 inch squares.  I use my Accuquilt die to cut the larger scrap pieces and rotary cutter to cut the smaller scrap pieces as a way to make the best use of the fabric.  I can cut 54 squares in one pass on my Accuquilt cutter which makes the task go by very quickly.  I cut a variety of shapes from my scraps but I will leave that topic for a future post.  

Since I have accumulated a large number of 2.5" squares, I decided to make a lap quilt from them.  I have made this pattern once before when I was finishing UFO projects in 2016.  You can see that quilt in my May 2016 list of quilts.  

I didn't use a commercial pattern for the quilt but decided to just wing it with the squares I had on hand and fabrics from my stash for the sashing, cornerstones, backing and binding.  The quilting was done by me on my Bernina 350.  The one now in progress will follow the same process.  

This is a very versatile pattern since it can be made in a variety of sizes by changing the number of blocks and/or altering the number and width of borders. 

This leads into the reason for the title of this post.  

My quilt uses 12 blocks containing 36 squares each.  Doing the math, that equals 432 squares that need to be managed.  Each block measures 15" before sewing.  I lay out each block on my Big Board as the squares are selected. 

 I don't have the room for a design wall but I needed to find a way to store the squares for each block so they remained together and in some semblance of order.  I looked at baskets and trays and plastic bags but nothing met my needs.  I looked for boxes that had compartments but none of them had the right size for storing the squares.  Then I visited a Container Store near my home and found the perfect storage system.  It has stackable plastic boxes that have 3" compartments, perfect for 2.5" squares. I chose boxes with 6 compartments and purchased 4 of them along with a coordinating cover for the top of the stack.  They were also reasonably priced!  

Each compartment is the perfect size to hold the 36 squares for each block.  My quilt will need 12 compartments, or 2 boxes.  I use another box for the sashing cornerstones and extra squares just in case. The top box is covered which is allows me to take it when I travel to our cabin.  The 4th box is for future use.  

So, you may have heard of wine in a box, I now have a quilt in a box!  The cost was less than $35 dollars.  These boxes are available on line as well.


These are called "Pure Boxes" and come in a variety of sizes and number of compartments.  An answer to my prayers!

Do something happy today!  


Tuesday, January 22, 2019

2019 - Filling the Bucket

It's been a few months since I posted anything here.  Life intervened with both good and bad stuff.  Good stuff included wonderful trips to Cape Hatteras in May (with family) and October (with just the Hubs).  Weather was good and fishing was productive on both trips.  We did not bring our Kirby dog on either trip as we had in the past 15 years.  He was getting too weary to do the trip so we left him with our vet in May where he did great.  On this trip we also celebrated an engagement of  two of the youngsters in our family group in Hatteras.  He dropped a knee on the edge of the shore - she said yes!

We also did not take Kirby for our two weeks in October but this, sadly, was because one weekend in early September while we were away for a short trip to Delaware, he went to sleep and crossed the Rainbow Bridge.  We are still in the process of adapting to life without him.

In addition, we lost a dear family member from complications of diabetes.  I requested some of his shirts to make a quilt from them for my sister-in-law.  I have not been able to look at them yet, but soon I will. He was a sweetheart and will be sorely missed.

Happiness returned in early December when a nephew tied the knot to a lovely new member of the family.  It was a cold and rainy day in a beautiful, historic church in Valley Forge. We had such a grand time with all the family, food, dancing and music!

The last black cloud of the year - hopefully the last - was a horrific cold that hit both me and my husband.  No fever or chills but a continuous cough that just would not quit!  For six weeks it would not quit!  Both of us visited medical experts who had waiting rooms full of folks with the same cough!  I finally was given a medication that eased the cough at night and helped me get more than 90 minutes of sleep per night.  I am not a very nice person when I lose that much sleep.  Finally, after 6 weeks, that dratted cough is gone.

2019 has arrived!  And so has my quilting mojo! 

I have several quilts nearing completion, but these are gifts so I can't publish them here just yet.  I have also been busy sorting and cutting scraps and organizing my quilting fabrics, precuts and books.  I did not finish some the UFO projects from the APQ list I thought I could get through.  I will work on them this year but I did not join the APQ UFO project this year.  At this point it does not give me the flexibility I need to work on my projects as needed with all of the other projects on my plate.  

One of the things I try to do with each project is learn something new, try a new technique, try a different type of quilting, learn how to use all the things my sewing machines can do.  I think I found a wonderful way to do this while working on my projects - a bucket list!  While reading the latest issue of the American Patchwork and Quilting magazine, I read an article describing a quilting bucket list.  This list is a checklist of 50 items to try.  I have already done 14 of them.  Of the 50 things to do on the list, 3 are to make a quilt of my choice.  I can think of a log cabin quilt, a tumbler quilt and a storm at sea quilt which could check those three boxes at some time in the future.  

So the 14 boxes that are already checked are 3, 4, 9, 11, 14, 15, 19, 26, 27, 35, 36, 37, 39, and 46.  To see what these numbers mean, or to print out your own quilting bucket list, go to allpeoplequilt.com/bucketlist.  

I will now select one or two bucket list items to work on while I work on my current projects and will report my progress in my next blog post, pictures will be included.  Until then, happy quilting!  

Wednesday, August 29, 2018

Little quilts, big lessons!


I have gotten into a routine of trying a new technique or learning something new with each quilt I make.  I started looking through my quilting projects both done and in-progress to decide which ones were ready for a blog post.  As I was starting to draft a blog post for each one, it dawned on me that they all had something in common - I tried something new on each one of them.  So I decided to do a post on the new or different techniques I tried on each one of them instead of focusing on the quilt themselves.  

I made a quilt for each of my brother's grands.   One of them liked "howls" or owls and the other little one did not have a preference but I found a kit from a local quilt shop that was just perfect for her.  

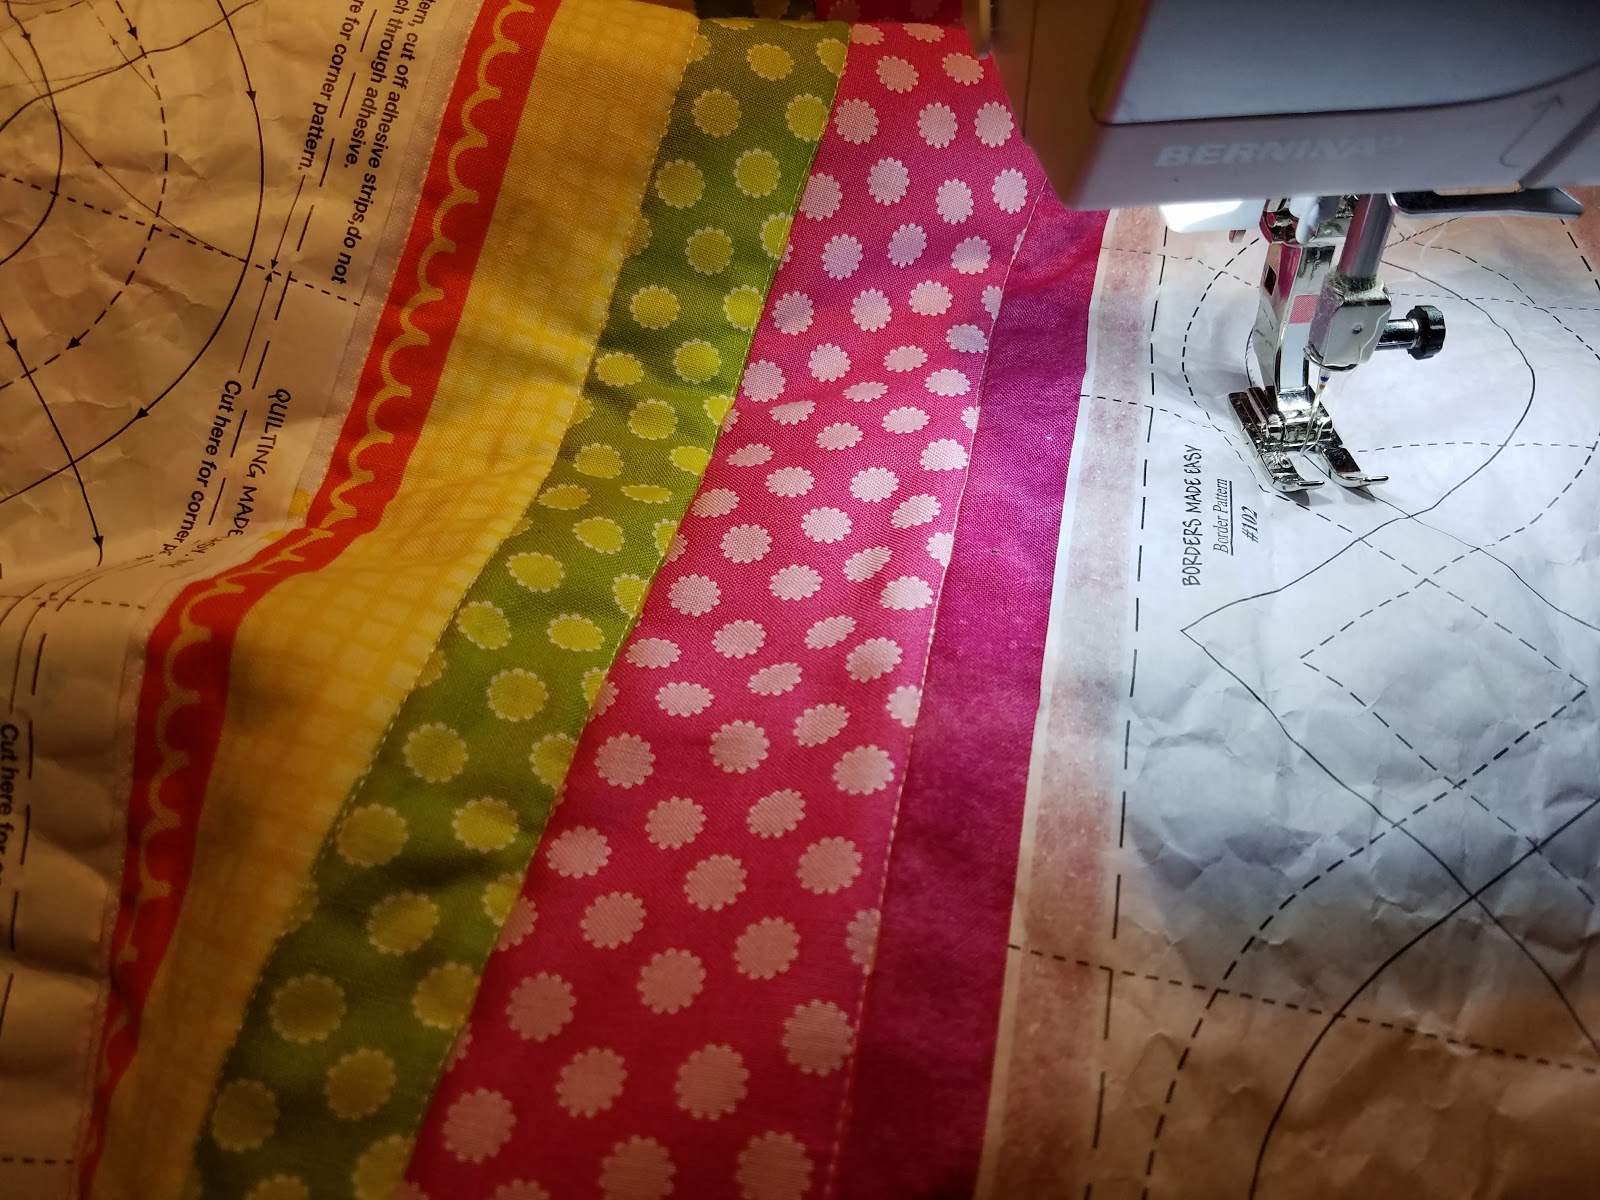
The  fabric I used for the "howls" quilt was a horizontal striped fabric that I could not bring myself to cut.  It made perfect sense to cut it down to size, add a border and call it a day.  However I wanted to add a bit of fancy work to the borders to counteract the linear look of the stripes.  One problem - I don't do free motion quilting.  But, I did have a roll of paper quilting pattern that is adhered to the fabric and used a guide for machine quilting!


This is called "Borders on a Roll".  You simply cut the size you need off the roll and adhere it to the border using the sticky edges of the paper.  It worked beautifully!  There are a variety of patterns to chose from as well.  This will be a technique I will use again and again!

Front of quilt
Backing fabric


The stripes on the front of the quilt were machine quilted above and below each of the divider bars.  I love how this quilt turned out!

The second lesson I learned was about using quilt labels.  I don't use labels on many of my quilts as others do, but on very special ones, I do.  I think my biggest fear is that the print on the label will run when the quilt is washed and as the last thing that is done prior to gifting the quilt, a ruined label will also ruin the quilt.  But I wanted to label this particular quilt.  We were invited to a birthday party to celebrate the 90th birthday of a very special lady named Rose.  I was at a loss as to what to give her as a gift and I knew I had less than a week to decide, but I ultimately chose to make a lap size quilt.  I found the perfect fabric in my stash and the count down clock started!  The quilt was made using the "tube method" which I will describe in the next lesson learned.  It went together very quickly.  The fabric used for the borders was a surprise find in my stash - all roses!  Once the quilt was finished, I decided to add a special label.  I knew I needed to practice to find the right words, the right ink and the right method of adhering the label to the quilt.  I found a printable frame on line and tested it with iron-on paper and several inks.  I finally found a combination that worked.  The quilt was completed on time and was loved by the lady for whom it was made!  I see more labels in my future!


The last lesson I want to tell you about is tube quilting!  This technique was used to make a quilt for the sister of the little lady who loved "howls".  As it turns out, I had a quilt kit in my stash that was just perfect for her.  It came with all the fabrics and the directions instructed me to cut strips from each of the appropriate fabrics and then sew them together to make a large strip set.  With the tube technique, the sewing is done first, then the cutting follows.  The sides of the strip set are then sewn to each other right sides together to make a tube.  The tube was then cut across the top of the strip set to create multiple loops.  In order to get the pattern to cascade, you need to find your friend Jack (the ripper).  A seam between a different fabric loop is then ripped to create a flat strip again.  These strips are then sewn to each other to create the quilt top with a cascading pattern.  Add borders and backing and the quilt is done.  

I love this technique (Rose's quilt was made using the same technique).  This method is more time friendly than sewing 64 blocks together!  You can find a similar pattern called Streaks of Sunshine on the quiltville.com website.  

Here's how the quilt front and backing turned out:


I hope you enjoyed reading about my adventures outside the box!  Comments, as always, are welcome!