Showing posts with label quilts. Show all posts

Wednesday, June 16, 2021

A New Ruler Does the Trick

It's been an odd year to be sure. The universe gave me lots of time during quarantine to quilt, read, walk, and eat more than I really needed to eat.  I think a lot of my mood was attributed to a long bleak winter and missing seeing family and friends.  I did manage to get some quilting projects finished and mailed to their new owners as well of getting lots of face masks sewn.  I have a large lap quilt that is ready for the hand binding on the back and then that pretty much completes the larger projects on my list.  The majority of projects completed just needed making binding, adding binding to the front and then hand sewing the binding to the back of the item.

Binding has not been my favorite activity but I was determined to improve how I created the binding strips and joined them together.  

I also had several jelly rolls that were just waiting for a lightbulb moment.  One jelly roll had been opened so I could see the colors of the 40 strips.  They really called to me!  I wanted to make a jelly roll race quilt which I knew I could make in less than a day.  But I was not looking forward to drawing 45 degree lines on the ends of each strip in order to sew them together.  There had to be a better way.  I have been striving to learn a new technique with each new project when possible so I explored options.  Then I found the perfect solution when I was binge reading You Tube quilting sites!  I discovered a new ruler by Creative Grids called a Folded Corner Clipper designed by Susan Nelson.  


This ruler will cut corners from 1 inch to 5 inches.  Lots of tutorials are available on the web, just use your favorite search engine to find them.

The jelly roll race quilt used 40 strips which means 80 ends to connect.  The ruler made easy work of this task! 


This shows the placement of the ruler for cutting 2.5" strips.

Once cut, the 2 ends fit together like pieces of a puzzle.  Then sew.  Once the ends are connected, just keep adding the strips together to complete the top of the race quilt.  This took me less than 3 hours.  Here is the top I made.  It now needs borders, backing and binding and will finish to a 50" x 65" quilt top before borders.  I will definitely use my new ruler to make the binding strips as well.  


This is the top so far, it's a Robert Kaufman jelly roll in Vincent Van Gogh colors.  I have 2 more jelly rolls that are ready for racing as well!  Now to search my stash for backing and binding fabrics!  

Enjoy your day folks, do something quilty!  


Friday, August 2, 2019

Thinking inside the box(es)

I have not posted in a while due to a busy schedule of home improvement projects, family get-togethers, travels to OBX, and spending time at our cabin fishing for the big bass and tasty trout.  However, I have been able to chisel out some time for some quilt related activities.  I have a few quilts nearing completion but most of what I could do needed to be mobile projects that did not require a sewing machine and could be done at our mountain cabin.  

Some of the things that I worked on included sorting and culling down my magazine collection, sorting my boxes and bags of scraps, cutting the aforementioned scraps into shapes and sizes for future projects and hand quilting the bindings onto sandwiched quilts.  I also managed to sort my quilting tips, tricks and patterns that I have printed and clipped over the last 25 years or so into plastic sleeves and file them by category into binders. 

One of my favorite sizes that I cut my scraps into is 2.5 inch squares.  I use my Accuquilt die to cut the larger scrap pieces and rotary cutter to cut the smaller scrap pieces as a way to make the best use of the fabric.  I can cut 54 squares in one pass on my Accuquilt cutter which makes the task go by very quickly.  I cut a variety of shapes from my scraps but I will leave that topic for a future post.  

Since I have accumulated a large number of 2.5" squares, I decided to make a lap quilt from them.  I have made this pattern once before when I was finishing UFO projects in 2016.  You can see that quilt in my May 2016 list of quilts.  

I didn't use a commercial pattern for the quilt but decided to just wing it with the squares I had on hand and fabrics from my stash for the sashing, cornerstones, backing and binding.  The quilting was done by me on my Bernina 350.  The one now in progress will follow the same process.  

This is a very versatile pattern since it can be made in a variety of sizes by changing the number of blocks and/or altering the number and width of borders. 

This leads into the reason for the title of this post.  

My quilt uses 12 blocks containing 36 squares each.  Doing the math, that equals 432 squares that need to be managed.  Each block measures 15" before sewing.  I lay out each block on my Big Board as the squares are selected. 

 I don't have the room for a design wall but I needed to find a way to store the squares for each block so they remained together and in some semblance of order.  I looked at baskets and trays and plastic bags but nothing met my needs.  I looked for boxes that had compartments but none of them had the right size for storing the squares.  Then I visited a Container Store near my home and found the perfect storage system.  It has stackable plastic boxes that have 3" compartments, perfect for 2.5" squares. I chose boxes with 6 compartments and purchased 4 of them along with a coordinating cover for the top of the stack.  They were also reasonably priced!  

Each compartment is the perfect size to hold the 36 squares for each block.  My quilt will need 12 compartments, or 2 boxes.  I use another box for the sashing cornerstones and extra squares just in case. The top box is covered which is allows me to take it when I travel to our cabin.  The 4th box is for future use.  

So, you may have heard of wine in a box, I now have a quilt in a box!  The cost was less than $35 dollars.  These boxes are available on line as well.


These are called "Pure Boxes" and come in a variety of sizes and number of compartments.  An answer to my prayers!

Do something happy today!  


Wednesday, August 29, 2018

Little quilts, big lessons!


I have gotten into a routine of trying a new technique or learning something new with each quilt I make.  I started looking through my quilting projects both done and in-progress to decide which ones were ready for a blog post.  As I was starting to draft a blog post for each one, it dawned on me that they all had something in common - I tried something new on each one of them.  So I decided to do a post on the new or different techniques I tried on each one of them instead of focusing on the quilt themselves.  

I made a quilt for each of my brother's grands.   One of them liked "howls" or owls and the other little one did not have a preference but I found a kit from a local quilt shop that was just perfect for her.  

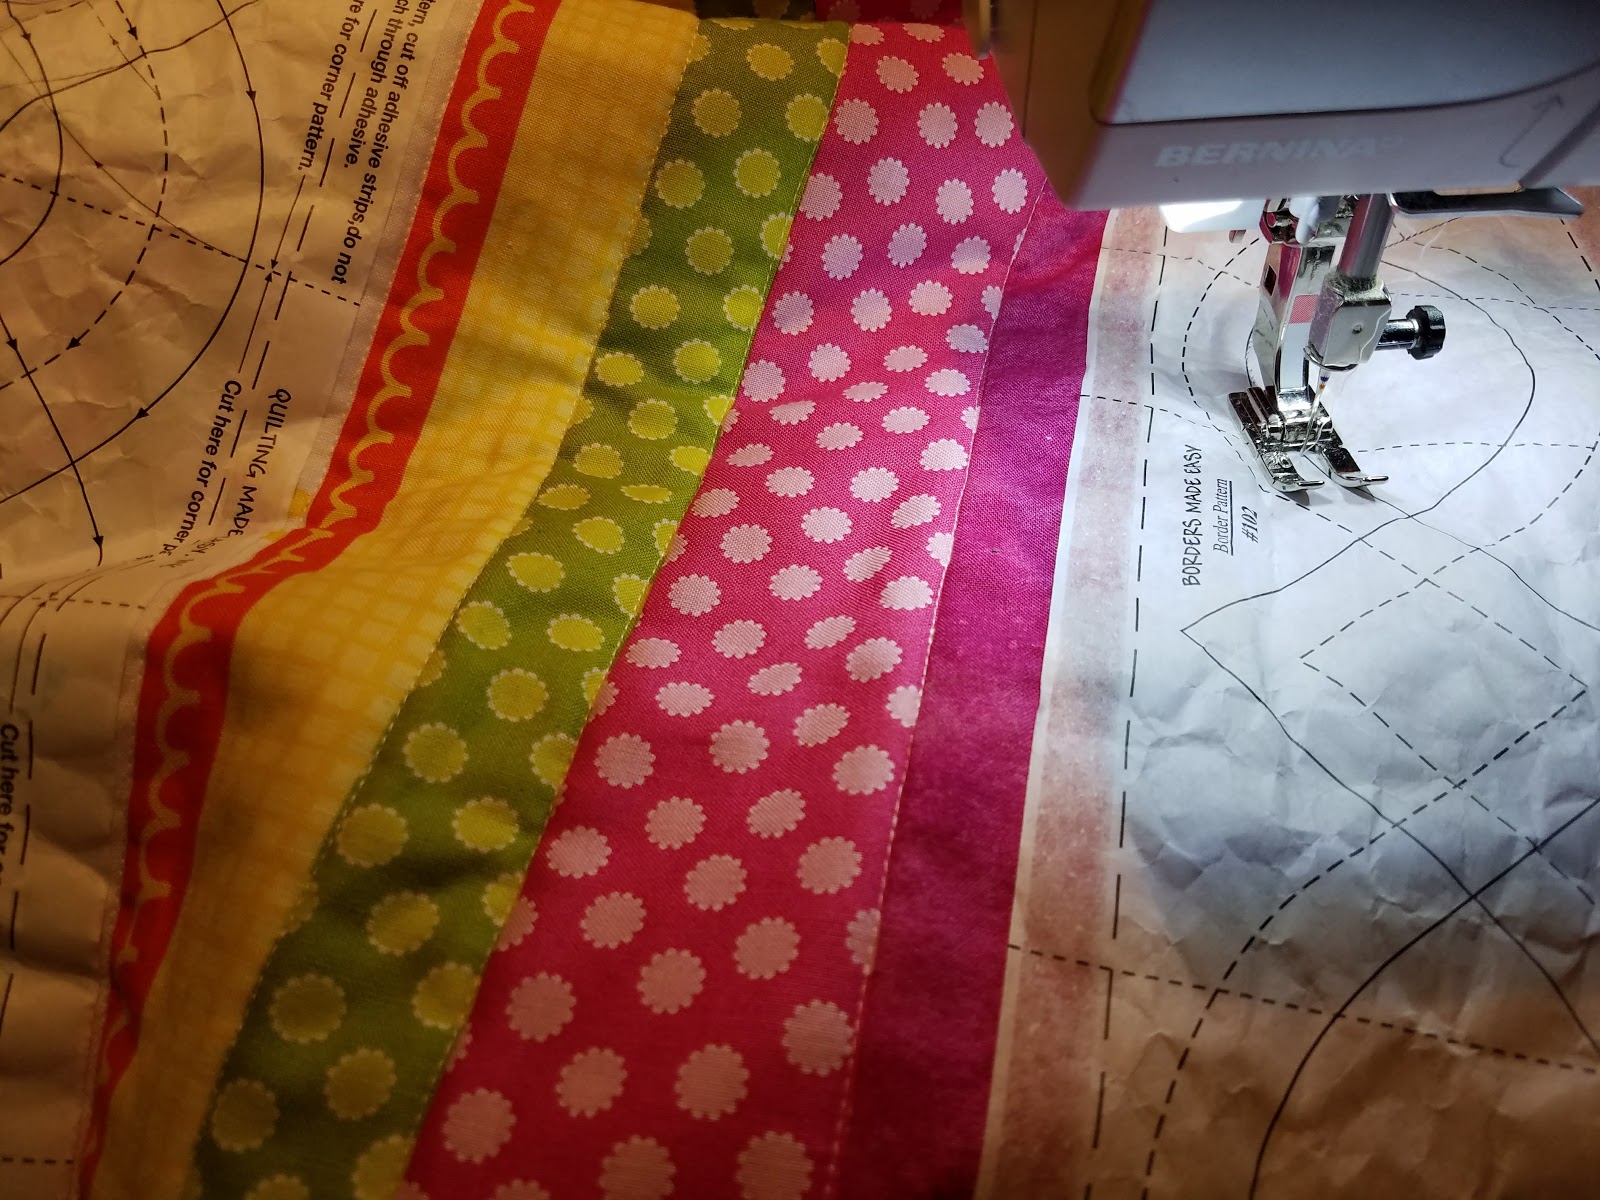
The  fabric I used for the "howls" quilt was a horizontal striped fabric that I could not bring myself to cut.  It made perfect sense to cut it down to size, add a border and call it a day.  However I wanted to add a bit of fancy work to the borders to counteract the linear look of the stripes.  One problem - I don't do free motion quilting.  But, I did have a roll of paper quilting pattern that is adhered to the fabric and used a guide for machine quilting!


This is called "Borders on a Roll".  You simply cut the size you need off the roll and adhere it to the border using the sticky edges of the paper.  It worked beautifully!  There are a variety of patterns to chose from as well.  This will be a technique I will use again and again!

Front of quilt
Backing fabric


The stripes on the front of the quilt were machine quilted above and below each of the divider bars.  I love how this quilt turned out!

The second lesson I learned was about using quilt labels.  I don't use labels on many of my quilts as others do, but on very special ones, I do.  I think my biggest fear is that the print on the label will run when the quilt is washed and as the last thing that is done prior to gifting the quilt, a ruined label will also ruin the quilt.  But I wanted to label this particular quilt.  We were invited to a birthday party to celebrate the 90th birthday of a very special lady named Rose.  I was at a loss as to what to give her as a gift and I knew I had less than a week to decide, but I ultimately chose to make a lap size quilt.  I found the perfect fabric in my stash and the count down clock started!  The quilt was made using the "tube method" which I will describe in the next lesson learned.  It went together very quickly.  The fabric used for the borders was a surprise find in my stash - all roses!  Once the quilt was finished, I decided to add a special label.  I knew I needed to practice to find the right words, the right ink and the right method of adhering the label to the quilt.  I found a printable frame on line and tested it with iron-on paper and several inks.  I finally found a combination that worked.  The quilt was completed on time and was loved by the lady for whom it was made!  I see more labels in my future!


The last lesson I want to tell you about is tube quilting!  This technique was used to make a quilt for the sister of the little lady who loved "howls".  As it turns out, I had a quilt kit in my stash that was just perfect for her.  It came with all the fabrics and the directions instructed me to cut strips from each of the appropriate fabrics and then sew them together to make a large strip set.  With the tube technique, the sewing is done first, then the cutting follows.  The sides of the strip set are then sewn to each other right sides together to make a tube.  The tube was then cut across the top of the strip set to create multiple loops.  In order to get the pattern to cascade, you need to find your friend Jack (the ripper).  A seam between a different fabric loop is then ripped to create a flat strip again.  These strips are then sewn to each other to create the quilt top with a cascading pattern.  Add borders and backing and the quilt is done.  

I love this technique (Rose's quilt was made using the same technique).  This method is more time friendly than sewing 64 blocks together!  You can find a similar pattern called Streaks of Sunshine on the quiltville.com website.  

Here's how the quilt front and backing turned out:


I hope you enjoyed reading about my adventures outside the box!  Comments, as always, are welcome!


Saturday, March 24, 2018

Sister's Surprise


One of the quilts I had on my list of things to do was a quilt for my sister.  I did make a lap quilt for her many years ago as well as some table runners and table toppers within the last three years or so for her new home but this one was a larger size.

On a recent visit to my home, she used a quilt I keep in our family room which is a great size when watching TV on chilly nights.  She loved the size!  It is bigger than a lap quilt but smaller than a bed quilt.  I already knew her favorite colors so now that I knew what size would work I started formulating a quilt design in my head.  I found a pattern on the Missouri Star Quilt Company's website that had just published a tutorial for it.

This quilt was made with precuts, also from Missouri Star Quilt Company.  I have grown very fond of precuts and have a few many charm packs, jelly rolls and layer cakes from there.  This particular quilt was made from two layer cakes, one all white and one of many patterns in blue (Annabelle by Windam Fabrics).  I used yardage from the same line for the border and Charlotte by Kensington Studios for the  backing.

The HST blocks were made from one of the blue layer cake squares and one of the white layer cake squares.  This produced 8 HSTs when the squares were placed right sides together and then sewn around all four sides with a 1/4" seam.  Then the unit was cut from corner to corner and in half from side to side and top to bottom.  I love this method!  The blocks were pressed to the dark side and squared up to 6.5 inches using my Bloc_Loc ruler.  This ruler makes squaring up so easy!


Layout of squares
Testing border fabric
Testing double borders
Having lots of space to layout the quilt is a big help when chain piecing.  One mistake here could result in lots of unstitching!  Ask me how I know!  I was in a quandary about the border or borders.  I finally decided on a single border and would plan on using the white yardage to make the binding.  As is my usual practice, I made the binding once the borders were added so everything was ready after the quilting was finished.

At this point my sister did not know I was making this quilt for her.  But now it was time to get the quilting done.  This was the one thing I wanted her pick so I took her to the quilt shop where the quilting would be done and surprised her with the quilt.  She picked out a beautiful pattern!  I showed her the binding I planned to add but she wanted a bit more color in the binding.  When I showed her several samples of flange binding, she made her decision.  It did make a beautiful finish to the quilt and I was able to bind by machine this time rather than hand sew the binding down.

Quilt backing
Flange binding

This is the finished quilt after being hand delivered to my sister in mid-March.  She loved it and I am sure it will be put to good use!  I love this pattern and I am sure more quilts will be made using it!


My revised blog is almost up to date with finished projects.  I have a few more posts to make which will be done within a few weeks.  Then on to some new projects.  Stay tuned!


Sunday, March 11, 2018

Binding at the Beach

I realize it is still winter with snow on the ground and more predicted (at least where I live) but this is actually a catch-up post for the first of 3 quilts I finished up last October.  My blog was undergoing renovations so I delayed posting anything until the blog was back up and running.  So this posting will share memories of binding 3 quilts while my husband and I were on our annual fall Cape Hatteras vacation.  I was busy that fall making a large quilt for my sister-in-law to celebrate her retirement from the Virginia Beach school system.  If our schedules mesh, we stop by my brother and sister-in-law's house on our return trip from Hatteras back to NJ.  I also made toddler quilts for their 2 grand daughters.  It was my plan to have all of them completed so they could be dropped off during our visit.

The pressure was on!

The quilt for my SIL was well underway prior to our vacation trip.  The pattern was similar to the Super Simple Squares pattern on the Missouri Star Quilt Company (MSQC) website.  Check out the tutorial for this quilt.  I used a layer cake from my stash and cut it into quarters to make charm squares.  I used a solid ecru fabric, also from my stash, to cut the cornerstone blocks and the sashing.  The backing was also from my stash.  The quilt ended up being 70" by 82" when completed.  The quilting was done by the wonderful folks at the Old City Quilts shop.  While waiting for the quilting to be completed, I made the binding and had it ready to travel!

While the Hubs was fishing, I made myself comfortable in the cab of our truck.  I had nice music and beautiful ocean views which provided a very calming background for sewing down the binding.  I love using the Wonder Clips instead of pins on the binding.  No blood shed here!

You can see the circular quilting in the picture below.  I thought the circular stitching was a nice contrast to the square blocks and linear sashing.


The picture below was taken at the headquarters for Cape Hatteras State Park.  Lots of cars stopped to see the photo shoot!  One little sneaky critter watched us from behind the sign in front of the flag.  I did not notice him until I was looking at the pictures full size.  See the sweet little deer face?


I will post pictures and details of the two toddler quilts in the next post.  Thanks for reading chapter 1 of this story!  


Monday, June 5, 2017

Jelly Roll Race Quilt - The Finish Line

I wrote about this quilt several times over the years (yes, years!) but I am happy to report that this project has finally crossed the finish line! 

I started this journey in July of 2014.  That story was told in this blog post.  Here is how the quilt started:
If memory serves me correctly, this was the first jelly roll I ever used.  It certainly has not been the last.  I do have a few more jelly rolls waiting in the wings.  Some are already assigned to a future project, but the others are waiting for my inspiration to kick in. 
The top was completed in August 2016 when the borders were added and the backing was cut to proper size.  The binding fabric was chosen as well and cut to size.  Now all I needed to do was find the time to quilt it - or have it quilted by a local long armer. 
I am a big fan of MSQC (Missouri Star Quilt Company), as a matter of fact, the video of Jenny making a jelly roll race quilt was my inspiration for my quilt.  All of the materials were purchased from MSQC as well.  I thought it only fitting that I send the quilt there for machine quilting even though they were far from being local!  It was a very simple process using their website.  I did send the quilt to them just before the holidays so I knew up front that it would be added to the queue and would take a bit longer to be returned.  I purchased their batting as well.  I was not in a rush for completion so I was willing to wait.  Under ordinary circumstances, their wait time could be 6 weeks. 

I chose a holly leaf quilt pattern since this quilt used winter woodland themed fabrics.  My plan was to use this quilt at our cabin in the mountains.  I was a bit nervous about mailing my quilt out and making all the arrangements online, but I was so thrilled when I received the quilt back in mid-February 2017.  All the excess borders and batting were cut off and it was ready for binding.
                                              
 I was able to get to the binding step in May of this year.  I machine sewed the binding to the front of the quilt but the hand sewing of the binding to the back of the quilt was done at our cabin.  The weather was still cold there so the quilt was a welcome cover for my legs. 

Once I finished the binding, it was picture time.  I thought somewhere in the woods near our cabin would be appropriate.  I found the perfect spot right across the road!  As you can see, the completed quilt has come in very handy right into June since the weather remained in the mid-50s.  My husband has since adopted this quilt which is now warming his legs at our cabin!
I do have another jelly roll scheduled to be a repeat race quilt.  When I ordered the border fabrics for the first race quilt, I ordered enough for a second quilt so I have all the materials ready to go.  I hope the second quilt top will go just as quickly as the first one.  It's called a "race" quilt for a reason, but hopefully the finishing of the second one will go as quilting as the "race" sewing!  This quilt is now aptly named "Finish Line". 

I will have no hesitation about using the MSQC quilting services again.  I was completely pleased with the service, the quality of the work and their prices. 

I have several quilts in various stages of completion so hopefully I can blog about those soon.  We had quite a heavy travel schedule in April and May which I am certainly not complaining about, but it sure felt good to fondle my fabrics again! 

Until the next time! 

Sunday, January 8, 2017

APQ 2016 December UFO

I can hardly believe the APQ 2016 UFO Challenge has come to an end.  I am pretty pleased that I did as well as I did with completing 10 of 12 projects.  The twelve projects spanned everything from table runners to large quilts all in various stages of completion.  My September project was coming along nicely until my sewing machine died.  Taking the time to get the problem diagnosed and a solution created used up the majority of my quilting time.  I needed to put this one down and step away from the sewing room!  This is on my list for early 2017.  It may be late, but at least it will be finished, and finished well. 

My December project was probably the one that took the most time and labor, neither of which I had in a month where holidays required shopping, baking, decorating and attending family gatherings. 


This project was started during my "I love Civil War fabrics" period of the late 1990s.  My husband has always been intrigued by the Civil War period and reads anything he can find on this period in history, including this book.  The pattern I used was one of nine presented in Barbara Brackman's book "Quilts from the Civil War".  In addition to containing nine patterns for quilts made during this timeframe, it was also a wonderful resource describing the textiles of the period as well as why certain fabrics were used and how they were used.  The book also contains many pictures of quilts made and stories and excerpt from diaries, newspapers, magazines and letters. 

The pattern for the nine patch quilt presented in the book would have made a quilt finishing at 44.5" x 66.5" but I decided to add an additional column to make it a bit wider. 


Many of my other UFO projects were started during a class.  This one was one I chose to make since I was really enjoying the range of fabrics available for this period and, as a new-ish quilter, I was confident I could handle a quilt of 9 patch blocks and sashing.  The 9 patches were made by cutting individual 2.5" squares.  In today's world there are techniques that use strips and the "sew then cut" method.  I got a very small taste of what the women experienced when they made their blocks in the 1860s. 

As you may have guessed, this UFO remains a UFO.  Time was just not on my side for this one.  I did get 10 blocks completed and the 342 squares for the other 38 blocks are cut and assembled in sets ready to sew.  The fabrics for my sashing, backing and binding are prewashed and pressed.  So I have every confidence that this one will be finished and ready for quilting by the end of the first quarter of the new year.  I think this will make a fine twin size quilt for my guest room.  This room is most used by our 11 year old grandson when he visits and is very appropriate for him.  He, like his Grandfather, is also entranced by the history of the Civil War.   

So, it's time to come up with some projects for the new year!  Stay tuned.......


Saturday, January 7, 2017

APQ 2016 November UFO

Eleven down, one to go! This is my November UFO challenge project. It was started in February 2000 as a class project.  This is probably one of my more "vintage" unfinished objects!  I had only been quilting for a short time then. I think I have improved quite a bit since then. I like having a reminder! This was made with Civil War fabrics for my DH. He thinks it's perfect! I truly love that man!

I think it was just the luck of the draw that the two UFOs left for 2016 were the ones that required the most time and labor during the months that have the most events and/or holidays!  In addition to trying to complete this challenge, I had a two week vacation, a birthday, an anniversary, Thanksgiving, Christmas and all the activities associated with them!  But I think working on these projects grounded me during that very hectic time.  


Lots of HSTs to cut and sew!  I don't make them this way anymore thanks to all the tutorials on the MSQC website.  I did do  a lot of chain piecing though! 

The top is completed and the backing is cut to size.  When the weather warms up, I will spray baste the sandwich in our garage so I have good ventilation and then machine quilt this puppy. 

This will make a nice couch quilt in our New Jersey dwelling! 


Tuesday, August 30, 2016

APQ 2016 August UFO

The August UFO, my jelly roll race quilt, was a good selection for me after my harried time of getting my hand quilting project finished by the end of July.  This new UFO project was not part of a class nor was it a gift so there was not the usual pressure to get it done in a timely manner.  I made it because I was intrigued with the jelly roll race process that was all the rage at the time.  It was already pretty far along in the construction stage only needing borders to complete the top.  I had all the fabrics on hand, not only for the borders but for the backing and binding as well. I started this jelly roll race quilt when I saw a video of the process on You Tube. I was just starting to watch quilting tutorials on You Tube and saw several on the jelly roll race quilt. Then I saw the tutorial by Jenny Doan on the MSQC site. I knew then I just had to make one.  This type of quilt was made from one jelly roll and could be done is less than an hour, or so "they" said! This was my kind of quilt!  

When I researched the origin of the jelly roll race quilt I learned that the jelly roll was invented and trademarked by Moda Fabrics in September of 2010 according to The Sewing Directory blog.  I had not yet gotten hooked on the precuts which were now appearing on a regular basis along with all kinds of quilt patterns for them.  I must admit, I was getting very intrigued by them.  

In the previous post on my UFO Challenge projects I stated that my jelly roll race quilt was started last year, but when I looked back at the history of this project, it was actually started in in July of 2014 - time flies!  I did spend some time looking for a jelly roll that I liked and that had yardage that would make nice borders and backing.  I found them on the MSQC site and ordered them shortly afterwards.  I really did complete the strip piecing part of the top in about an hour!  The joining of the 42 strips end-to-end took a good portion of the time.  But then the sewing of the strip units together went along smoothly.  I liked the process! I would do it again!


When I was at the decision point for the border fabrics, I changed my mind from what I thought I would do and put the project aside for a while. I finally chose the alternative fabrics and placed the order for them.  But by that time, I had moved on to another project.  I added this to the UFO Challenge to get it completed since it was so far along and the challenge would inspire me to get it done in time to use it during the cool nights at our mountain cabin. This is a very young UFO for me! 

At this point, the top is completed and double bordered.  I have the pine-cone themed backing ready to go.  I also have the binding fabric ready but not yet cut (shown at the bottom of the picture below).  I originally thought I would do a flanged binding but I am reconsidering that method for a more traditional hand-sewn binding.  My other decision to make is whether I want to machine quilt it myself or send it out.  I am leaning more towards quilting it myself right now.  The quilt will finish at 60" x 75".  The fabrics used are from the "Through the Winter Woods" line by Holly Taylor for Moda. Stay tuned to see the quilt in use on a cozy couch!  


So, what did I learn from this project?  Well, even though there was very little cutting involved, it was important to sew my 1/4" seams so the strips did not "elbow".  I was also very careful about pressing the seams - there were a lot of them!  

Now to wait to see what project is chosen for the September UFO!  Eight down, four to go!  

Sunday, August 14, 2016

APQ 2016 July UFO

I have always loved the double wedding ring pattern.  I took a class to learn how to create the blocks.  I had not worked with curves before and I thought the class would educate me on that technique.  I did learn quite a bit in this class and I decided to make this a hand sewing project.  I decided to make the table runner with 3 rings.  I used 1930's fabrics and cut my templates from cardboard, another new technique for me.  

The class used a book by Rodale Press called "Wedding Ring Quilts".  I liked working with the ring and melon pieces and found the value of using pins - lots of pins!  This class was held over 3 sessions at the Quilter's Barn in Allentown in October and November of 2000, (I found a receipt for fabric in the book with this date on it!) another oldie but goodie.  I did not work on it on a continuous basis as it was a good mobile project that I could take on long car rides or when I could not do a machine quilting project.  It was so convenient to just take a small bag with the fabrics, some pins - lots of pins, some sewing needles, a needle threader, small pair of scissors and a spool of thread.  I worked on it here and there and got it to a point where it was ready to be finished.  That's when I added it to my APQ 2016 challenge.  

It is the smallest of any of my UFO projects but it was chosen as the July project at one of the busiest time of my year!  I did not want to rush through the finishing process just to get it done.  I wanted to finish it the way I had always intended - hand pieced, hand quilted.  I was clearly out of runway on this one! So, I decided to at least get the hand piecing completed.  I also intended to do a bias binding on the curves so I spent some time on you tube on how to make the binding and what size square I would need to cut.  That is probably a full day class in itself!  But I am ready to take that step.  

So, here are some photos of how this project has progressed over the last few multiple years:  

This is early on in the process.  You can see how many pins I used to attach the ring to the melon!  
Finally getting to the end of the hand piecing.  You can see the orignal pattern that was provided in the class.  This was for a 3 ring table runner.  A 4 ring wall hanging pattern was also provided.  I was glad I chose the table runner!   
This is the completed top.  It looks pretty good on my dining table in our mountain house! I don't think it will be used when food is on the table however!  


The project for August is a full size quilt but I think will be a lot easier to finish compared to the small table runner!  It is my first Jelly Roll Race quilt and was was started last year.  It needs borders, backing and quilting.  This will be a totally machine project, including the quilting.  I am thinking of using a flanged binding which can be attached by machine as well.  If you don't know about this type of binding, you can google flanged binding or magic binding.  

I hope to get this completed in time to use it at our cabin since it is made with all woodsy themed fabrics.  Here is where it stands right now.  The picture shows the top with the fabrics for the borders (burgandy and green) and the binding.  The pine cone fabric is the backing.  Looking forward to seeing how this one comes together!  


Stay tuned!  

Friday, July 8, 2016

APQ 2016 June UFO

When I first started quilting in the mid-90's, I loved to take classes to learn new techniques and to enjoy the company of other quilters.   I took lots of classes, some I enjoyed and some, well, not so much.  But enjoyed or not, I always learned something new and always came home with a completed project of some sort.  Oftentimes, the classes were just a few hours so I was able to make 1 or 2 completed blocks or part of a quilt top.  The rest of the project was completed at home or stored away for a future activity.  If I was not confident with the technique or just decided it wasn't something I would use anytime soon, the supplies and class instructions were packed away.  That was the case with my June UFO.  
This class was taken in July of 2002.  No, that is not a typo, it was in 2002.  It was my first experience with 5" squares.  They were not yet being called "charm squares".  This class was focused on using 5" scraps to make "Nickel Quilts" although the book also provided instructions for 4" and 6" scraps.  It was also my inauguration into the world of HSTs, half square triangles.  There was not one project to do for this class, there were two!  Each with their own cutting instructions, fabric requirements and layouts. I very quickly became overwhelmed.  As often happens with one-day classes, time was limited and the pace was quick.  The foundation unit for each of the 2 quilts was made from a 2 color HST which was then combined with a 3rd color square to make what was called a combination unit.  When these units were completed, there was a right handed version and a left handed version.  One class quilt used the right handed units and the other class quilt used the left handed units.  I did manage to make one block for each quilt before the class ended but I was beyond confused.  I like making the HSTs and was glad I learned that technique.  I was not enthusiastic about completing the two quilts simutaneously, one of which needed 35 blocks and the other which needed 16 blocks.  I packed everything away and moved onto other things.  I was still working full time and had limited quilting time so I wanted to work on things I could complete and enjoy doing.  

Several years ago, I did unearth the class materials and the book.  I had retired by then and I was taking inventory of my fabrics and projects in various stages.  I read the book instructions several times and finally had that "light bulb moment".  At this point I understood what I needed for each quilt, which units were complete and which units still needed to be cut or sewn.  I took lots of notes and added this UFO to my list for a future time.  


Fast forward to December 2015.  I read about a UFO Challenge being sponsored by APQ (All People Quilt).  It required me to list 12 unfinished projects and list them on Instagram.  Nothing needed to be purchased.  On the 1st of each month in 2016, APQ would chose a number between 1 and 12.  That number would identify the number of the UFO I needed to finish that month.  I could do that, I thought.  This project was number 10 on my list and it was chosen for June.  I had already completed 5 UFOs for January through May.  I knew this one would be the most difficult so far because of the two quilts involved.  I had no idea......


Here is what this project looked like when I started:


This shows the 2 blocks that were planned in the class.  The whirly gig is in the back and the pin wheel is in the front.  All of the units are cut and assembled at this point.

As I started to investigate what needed to be done to get this UFO completed by June 30th, I realized that the primary purpose of the class was to learn how to work with HSTs.  I did that.  It also hightlighted that the leftovers from making one quilt could be used to make a second quilt so the fabrics were not wasted.  I got that.  What I needed to wrap my brain around was that this class produced 2 UFOs, not just one and I didn't really need to physically finish 2 quilts to comply with the challenge.  So, I decided that I would make the larger of the 2 quilts this time (this one was my original objective from the class) and save the leftover units for another time.  That certainly simplified the process for me, more than I realized!  

As I got further into the construction of the 15 blocks needed to make a lap sized quilt, it became very clear that there would be tons of cutting, sewing, more cutting, more sewing and then squaring up of everything that was cut and sewn.  Each of the 15 blocks took 4 units and each unit took 4 squares to make.  
The most difficult of the construction was the size constraints.  The 60 units needed to be squared up to 4.25 inches.  Each block also needed center squares cut to 23/8 inches.  Each block also needed 8 rectangles measuring 4.25 by 23/8 inches.  Lots of unique cutting requirements.  The squaring up was the most difficult because these were combination units, not just HSTs.  

Two gadgets that proved invaluable were a 2.5" x 6" ruler from MSQC (Missouri Star Quilt Company) which was great to cut the pieces that needed to be 23/8 inches because of the clarity of the ruler markings and a Tucker Trimmer for the squaring up of the combination units.  I already had a Tucker Trimmer but it was designed for squaring up squares in 1/2" and whole number increments.  Then I saw that they also made one in 1/4" and 3/4" increments. Amazon next day delivery is fabulous!  This worked like magic on the combination units!  

These pictures show the completed top and the quilting on the front and back.  I kept it simple doing a SITD around the outside of each star and a cross hatch in the borders.  

I was pleased with how this project turned out - and on time!  I have named it "Seeing Stars" for several reasons.  It will live at our cabin and will warm my legs when I sit and read on the porch or in our summer room.  I am really glad this one is done.  I will make the second one with the leftovers at some point this year.  The fabrics will not be put away but will just be put aside for now.  

So what did I learn from this one:

Read the instructions until you understand every step.
Measure twice and cut once!
Square units make square blocks.  
Use the appropriate tools. 

So, I bet you are wondering which UFO is next on the list. Well, the number drawn for July was #4, or my Double Wedding Ring project.  I don't quite remember when I started this one but it is an all hand sewn project, hand cut with templates and hand pieced.  This picture was taken in 2011 so it does qualify to be an "oldie but goodie".  It served as my go-to project when I traveled which is partly the reason it is not yet done.  That's my story and I'm sticking to it!  

Stay tuned.........